ClaricoQUOTE API Guide
ClaricoQUOTE API Guide
The ClaricoQUOTE API allows for our quoting platform to communicate with other third-party systems like an ERP or CRM.
Introduction
The integration between ClaricoQUOTE and ERP or CRM systems varies from product to product, but the principles are the same. For an integration to be successful, three main things are required:
Data Connection
The first and most critical step in any integration is that a connection to the data is established. This data can come from csv files, a local database, and online API, or other means of data storage.
Data Pull
To prepare a proper quote, you must have access to the organizations, contacts, vendors, products, and costs in ClaricoQUOTE that an estimator can use to create parts and assemblies within a quote. Although this information can be created dynamically in ClaricoQUOTE, most of the time you will want this data from your ERP system to be available and up to date in ClaricoQUOTE.
Data Push
The final step in the integration process is to push the finalized quotes into your ERP system for further management and order creation.

This document outlines the steps required to complete the following:
Pull organizational data from ERP.
Pull vendor data from ERP.
Pull product, costs, and materials from ERP.
Push completed or won quotes back to ERP.
API Authentication
Please refer to Appendix.
Accessing REST API
The ClaricoQUOTE REST API will be used in all cases of integration. All access to the data pushed and pulled is done through the REST API with proper authentication to your tenant. This keeps access to each customer's data separated and accessible only through proper credentials. ClaricoQUOTE REST API are accessible at quote.claricosystems.com/API/Help/v1/index#/
Or by navigating to the Customization section of the settings in ClaricoQUOTE, Setup > Customization > REST API.

I. Using the API to Connect Organizations and Contacts from an ERP to ClaricoQUOTE
This section provides instructions on how to utilize the provided API to connect organizations and contacts from an ERP (Enterprise Resource Planning) system to ClaricoQUOTE. By following the steps outlined below, you will be able to pull organization data and contact data from your ERP and send it to ClaricoQUOTE for management. Your master contact and organization list should remain in your EPR systems, ClaricoQUOTE will import data from your ERP system.
Prerequisites
Before you begin, make sure you have the following:
Access to the API of your ERP system with the necessary credentials and permissions.
A valid ClaricoQUOTE account with administrative privileges.
i. Organization Data Pull from ERP into ClaricoQUOTE
This section provides an overview of how to use the API to pull organization data from your ERP system and synchronize them with ClaricoQUOTE.
Step 1: Obtain API Endpoint and Authentication Token
Contact your ERP system administrator or consult the ERP documentation to obtain the API endpoint for retrieving organization data from your ERP system.
Step 2: Retrieve Organization Data
To successfully connect organizations from your ERP to ClaricoQUOTE, it is essential to understand the JSON structure that represents organization data. The JSON structure contains various fields and their respective values. Here is an overview of some key fields:
OrganizationName: The name of the organization.
Description: A brief description or summary of the organization.
CustomerCode: A unique code or identifier assigned to the organization.
PrimaryContact: The primary contact person associated with the organization.
PrimaryEMail: The primary email address of the organization.
PrimaryPhone: The primary phone number of the organization.
Location: The geographical location of the organization.
Other fields: Explore the JSON structure to identify additional fields that may contain relevant organizational information.
Step 3: Develop Integration Code
Next, you need to develop code that connects to the ERP API, retrieves organizational data, and sends it to ClaricoQUOTE.
quote.claricosystems.com/API/Help/v1/index#!/OrganizationAPI/OrganizationAPI_Create
Step 4: Transfer Organization Data to ClaricoQUOTE
Execute the integration code you developed in the previous step. This code will establish a connection to your ERP system, retrieve organization data using the specified API endpoint, and send it to ClaricoQUOTE for further processing.
Note: Only modified contacts and organizations should be submitted after initial data pull to avoid unnecessary data load.
Step 5: Validate and Confirm
Once the data transfer is complete, verify that the vendors are successfully imported into ClaricoQUOTE. Perform any necessary checks or tests to ensure the accuracy and integrity of the transferred data.
Field Mapping
"OrganizationName": This field contains the name of the organization. It can be mapped to the organization name field in your ERP system. Required
"DisplayName": This field represents the display name of the organization if different from Organization Name. It can be mapped to the display name field in your ERP system.
"Location": This field represents the geographical location of the organization. It can be mapped to the location field in your ERP system.
"Region": This field represents the region associated with the organization. It can be mapped to the region field in your ERP system.
"Description": This field provides a brief description or summary of the organization. It can be mapped to the description field in your ERP system.
"CustomerCode": This field represents a unique code or identifier assigned to the organization. It can be mapped to the customer code field in your ERP system.
"ExternalReference": This field represents an external reference associated with the organization. It can be mapped to the reference ID in your ERP system.
"SalesLocation": This field represents the sales location of the organization. It can be mapped to the sales location field in your ERP system.
"Status": This field represents the status of the organization. It can be mapped to the status field in your ERP system.
"WaringLevel": This field indicates the warning level associated with the organization. It can be mapped to the warning level field in your ERP system.
"Active": This field indicates whether the organization is active. It can be mapped to the active status field in your ERP system.
"AccountManager": This field represents the account manager associated with the organization. It can be mapped to the account manager field in your ERP system.
"InternalSalesRep": This field represents the internal sales representative associated with the organization. It can be mapped to the internal sales representative field in your ERP system.
"Comment": This field provides additional comments or notes about the organization. It can be mapped to a comment field in your ERP system.
"Relationship": This field represents the relationship between the organization and another entity. It can be mapped to a relationship field in your ERP system.
"Rating": This field represents the rating or score assigned to the organization. It can be mapped to a rating field in your ERP system.
"CreditLimit": This field represents the credit limit assigned to the organization. It can be mapped to the credit limit field in your ERP system.
"CurrentBalance": This field represents the current balance associated with the organization. It can be mapped to the current balance field in your ERP system.
"PrimaryContact": This field represents the name of the primary contact associated with the organization. It can be mapped to the primary contact name field in your ERP system.
"PrimaryEMail": This field represents the primary email address associated with the organization. It can be mapped to the primary email address field in your ERP system.
"PrimaryPhone": This field represents the primary phone number associated with the organization. It can be mapped to the primary phone number field in your ERP system.
"ShipVia": This field represents the shipping method used for the organization. It can be mapped to the shipping method field in your ERP system.
"Custom1" and "Custom2": These fields represent custom fields that can be used to store additional information about the organization. They can be mapped to corresponding custom fields in your ERP system.
"CustomerType": This field represents the type or category of the customer. It can be mapped to a customer type field in your ERP system.
Note: The mapping of fields may vary depending on the specific data model and integration requirements of your ERP system. Adjustments may be necessary to ensure accurate synchronization between the ERP system and ClaricoQUOTE.
ii. Contact Data Pull from ERP into ClaricoQUOTE
This section provides an overview of how to use the API to pull contacts from your ERP system and synchronize them with ClaricoQUOTE.
Step 1: Obtain API Endpoint and Authentication Token
Contact your ERP system administrator or consult the ERP documentation to obtain the API endpoint for retrieving organization data from your ERP system.
Step 2: Retrieve Contact Data
To successfully connect contacts from your ERP to ClaricoQUOTE, it is essential to understand the JSON structure that represents contact data. The JSON structure contains various fields and their respective values. Here is an overview of some key fields:
Response Fields
The response contains an array of contacts under the "Results" field. Each contact object has the following fields:
"ExtRef": The external reference associated with the contact.
"ExtRefType": The type of external reference (e.g., "NoExtRef").
"UserName": The username associated with the contact.
"UserID": The unique identifier of the user.
"ID": The unique identifier of the contact.
"ParentID": The unique identifier of the parent contact.
"FirstName": The first name of the contact.
"MiddleName": The middle name of the contact.
"LastName": The last name of the contact.
"DisplayName": The display name of the contact.
"Title": The title or position of the contact.
"Department": The department associated with the contact.
"Status": The status of the contact.
"ContactOwner": The owner or responsible person for the contact.
"LeadSource": The lead source of the contact.
"Comment": Additional comments or notes about the contact.
"Relationship": The relationship of the contact.
"PrimaryEMailID": The unique identifier of the primary email associated with the contact.
"PrimaryEMail": The primary email address of the contact.
"PrimaryPhoneID": The unique identifier of the primary phone number associated with the contact.
"PrimaryPhone": The primary phone number of the contact.
"PrimaryOrganizationID": The unique identifier of the primary organization associated with the contact.
"PrimaryOrganization": The primary organization name associated with the contact.
"PrimaryVendorID": The unique identifier of the primary vendor associated with the contact.
"PrimaryVendor": The primary vendor name associated with the contact.
"EnteredBy": The user or entity that entered the contact.
"EnteredDate": The date and time when the contact was entered.
"ModifiedBy": The user or entity that last modified the contact.
"ModifiedDate": The date and time when the contact was last modified.
Mapping Code to ClaricoQUOTE
When pulling contacts from your ERP system to ClaricoQUOTE, you can map the corresponding fields as follows:
Clarico Field: ERP Field
Contact External Reference: ExtRef
Contact External Reference Type: ExtRefType
Contact Username: UserName
Contact User ID: UserID
Contact ID: ID
Parent Contact ID: ParentID
First Name: FirstName
Middle Name: MiddleName
Last Name: LastName
Display Name: DisplayName
Title: Title
Department: Department
Status: Status
Contact Owner: ContactOwner
Lead Source: LeadSource
Comment: Comment
Relationship: Relationship
Primary Email ID: PrimaryEMailID
Primary Email: PrimaryEMail
Primary Phone ID: PrimaryPhoneID
Primary Phone: PrimaryPhone
Primary Organization ID: PrimaryOrganizationID
Primary Organization: PrimaryOrganization
Primary Vendor ID: PrimaryVendorID
Primary Vendor: PrimaryVendor
Entered By: EnteredBy
Entered Date: EnteredDate
Modified By: ModifiedBy
Modified Date: ModifiedDate
Ensure that the field mappings are correctly configured in your integration between the ERP system and ClaricoQUOTE to facilitate accurate data synchronization.
Step 3: Develop Integration Code
Next, you need to develop code that connects to the ERP API, retrieves organizational data, and sends it to ClaricoQUOTE using the JSON structure provided.
quote.claricosystems.com/API/Help/v1/index#/ContactAPI
Step 4: Transfer Contact Data to ClaricoQUOTE
Execute the integration code you developed in the previous step. This code will establish a connection to your ERP system, retrieve contact data using the specified API endpoint, and send it to ClaricoQUOTE for further processing.
API Endpoint
To retrieve contacts from your ERP system, make a GET request to the following API endpoint:
bashCopy code
GET /api/contacts
Request Parameters
The API request does not require any additional parameters. However, you may include pagination parameters if needed.
Step 5: Validate and Confirm
Once the data transfer is complete, verify that the vendors are successfully imported into ClaricoQUOTE. Perform any necessary checks or tests to ensure the accuracy and integrity of the transferred data.
Conclusion
By following the steps provided here, you have successfully utilized the provided API to connect organizations and contacts from an ERP system to ClaricoQUOTE. The integration allows you to access and manage organization data within ClaricoQUOTE but the master data should be maintained in the ERP system.
II. Pulling Vendor Data from ERP to ClaricoQUOTE
This section provides guidance on how to integrate vendor information from an ERP (Enterprise Resource Planning) system to ClaricoQUOTE. The integration will involve extracting vendor data from the ERP system in a specified JSON format and transferring it to ClaricoQUOTE. We recommend only pulling vendors that are relevant for ClaricoQUOTE which are usually vendors used for outsourcing.
Please use the following steps to pull vendor data from the ERP system to ClaricoQUOTE:
Prerequisites
Before you begin, make sure you have the following:
Access to the API of your ERP system with the necessary credentials and permissions.
A valid ClaricoQUOTE account with administrative privileges.
Step 1: Obtain API Endpoint and Authentication Token
Contact your ERP system administrator or consult the ERP documentation to obtain the API endpoint for retrieving organization data from your ERP system.
Step 2: Retrieve Vendor Data
To successfully connect vendors from your ERP to ClaricoQUOTE, it is essential to understand the JSON structure that represents vendor data. The JSON structure contains various fields and their respective values. Implement a query or API call to fetch the vendor data from the ERP system. Structure the query to retrieve the following fields for each vendor:
VendorOperations
RegisteredVendor
VendorKey
SupplyMaterial
OperationCount
ID
ParentOrganizationID
ParentID
OrganizationName
DisplayName
NameAndLocation
Location
Region
Description
CustomerCode
ExternalReference
SalesLocation
Status
WaringLevel
Active
PortalAccess
Registered
AccountManager
InternalSalesRep
Comment
Relationship
Rating
CreditLimit
CurrentBalance
PrimaryContactID
PrimaryContact
PrimaryEMailID
PrimaryEMail
PrimaryPhoneID
PrimaryPhone
ShippingAddressID
BillingAddressID
ShipVia
Custom1
Custom2
PORequired
CustomerType
EMailShippingDoc
LastActivityDate
PaymentID
SetContact (including subfields)
SetEMail (including subfields)
SetPhone (including subfields)
EnteredBy
EnteredDate
ModifiedBy
ModifiedDate
Step 3: Develop Integration Code
Next, you need to develop code that connects to the ERP API, retrieves vendor data, and sends it to ClaricoQUOTE using the JSON structure provided.
quote.claricosystems.com/API/Help/v1/index#/VendorAPI
Step 4: Transfer Vendor Data to ClaricoQUOTE
Execute the integration code you developed in the previous step. This code will establish a connection to your ERP system, retrieve vendor data using the specified API endpoint, and send it to ClaricoQUOTE for further processing.
Step 5: Validate and Confirm
Once the data transfer is complete, verify that the vendors are successfully imported into ClaricoQUOTE. Perform any necessary checks or tests to ensure the accuracy and integrity of the transferred data.
Conclusion
By following these steps, you will be able to integrate vendor information from your ERP system to ClaricoQUOTE. Adjust the implementation details based on your specific ERP system and integration requirements.
III. Pulling Costs and Products from ERP into ClaricoQUOTE
The following section will explain how to pull cost data from an ERP (Enterprise Resource Planning) system and integrate it into ClaricoQUOTE. Although parts and assemblies can be created dynamically in ClaricoQUOTE, the integration aims to synchronize cost information between the two systems, ensuring consistency and accuracy. This section outlines the steps to retrieve cost data from the ERP system using the provided JSON structure and explains the integration process.
Prerequisites
Before you begin, make sure you have the following:
Access to the API of your ERP system with the necessary credentials and permissions.
A valid ClaricoQUOTE account with administrative privileges.
Step 1: Obtain API Endpoint and Authentication Token
Contact your ERP system administrator or consult the ERP documentation to obtain the API endpoint for retrieving organization data from your ERP system. Use the appropriate method or library to establish a secure connection with the ERP system. Provide the necessary authentication credentials and ensure that the connection complies with the security protocols and standards in place.
Step 2: Retrieve Cost and Product Data
Construct a POST request to the /api/costs/pull endpoint of the ERP system. Set the request body to the provided JSON structure to fetch the cost data. Include any additional parameters or headers required for authentication or data retrieval.
The important note here on pulling products is that we MUST be able to distinguish the difference between the product types when parsing the data. Also, because ClaricoQUOTE is a geometric based system, we must be able to pull the dimensions of each product type. For example, if pulling a sheet product, we require the following data points:
Material Grade
Thickness
Length
Width
Cost
We understand that not all ERP systems are aware of fabrication materials and sometimes special custom fields are created and/or a special description template is used which is acceptable. However, if these requirements are not met, we will request a data cleanup and grouping task on your system before the product integration can be attempted.
Step 3: Develop Integration Code
Next, you need to develop code that connects to the ERP API, retrieves cost and product data, and sends it to ClaricoQUOTE using the JSON structure provided.
quote.claricosystems.com/API/Help/v1/index#/CostAPI
quote.claricosystems.com/API/Help/v1/index#/ProductAPI
Step 4: Transfer Cost and Product Data to ClaricoQUOTE
Execute the integration code you developed in the previous step. This code will establish a connection to your ERP system, retrieve cost and product data using the specified API endpoint, and send it to ClaricoQUOTE for further processing.
Step 5: Validate and Confirm
Once the data transfer is complete, verify that the vendors are successfully imported into ClaricoQUOTE. Perform any necessary checks or tests to ensure the accuracy and integrity of the transferred data.
Conclusion
This section provides a formal guide for pulling cost and product data from an ERP system and integrating it into ClaricoQUOTE. By following the outlined steps, you can ensure the seamless synchronization of cost information between the two systems.
Note: this documentation serves as a template, and you should customize it to fit your specific integration requirements and systems.
IV. Using API to Push Quotes from ClaricoQUOTE to ERP
The final step in the integration process is to push the finalized quotes into your ERP system for further management and order creation. We recommend against pushing directly to production orders because we believe it is important to review the final accepted quote and then convert it to an order using your ERP system as additional information modifications may be needed as it is moved to production. Being a quoting system, ClaricoQUOTE may not handle some of the advanced routing aspects of what a production order requires nor are the details of manufacturing known at the time of quoting. For these reasons we believe it is best to push the quotes back and handle production in the ERP system. For pushing back quotes as simple sales orders into an accounting system this is not a concern and can easily be done.
quote.claricosystems.com/API/Help/v1/index#/QuoteAPI
API Endpoint
Endpoint: /api/quotes/push
Method: POST
Request Parameters
None
Request Body
Example JSON Structure:
Response
The response will indicate the success or failure of the integration process.
Automation
The integration services are capable of being set up on an automated schedule of your choice for each piece of the data migration. Each stage of the pull and push can be set up with a frequency as needed according to your business requirements.
Appendix
API Authentication
1. API Authentication Overview:
The ClaricoQUOTE API uses a RESTful interface using HTTP requests to GET, PUT, POST, and DELETE data following the REST standards. In order to make these calls you must first authenticate the request. A visual of this process is shown below.
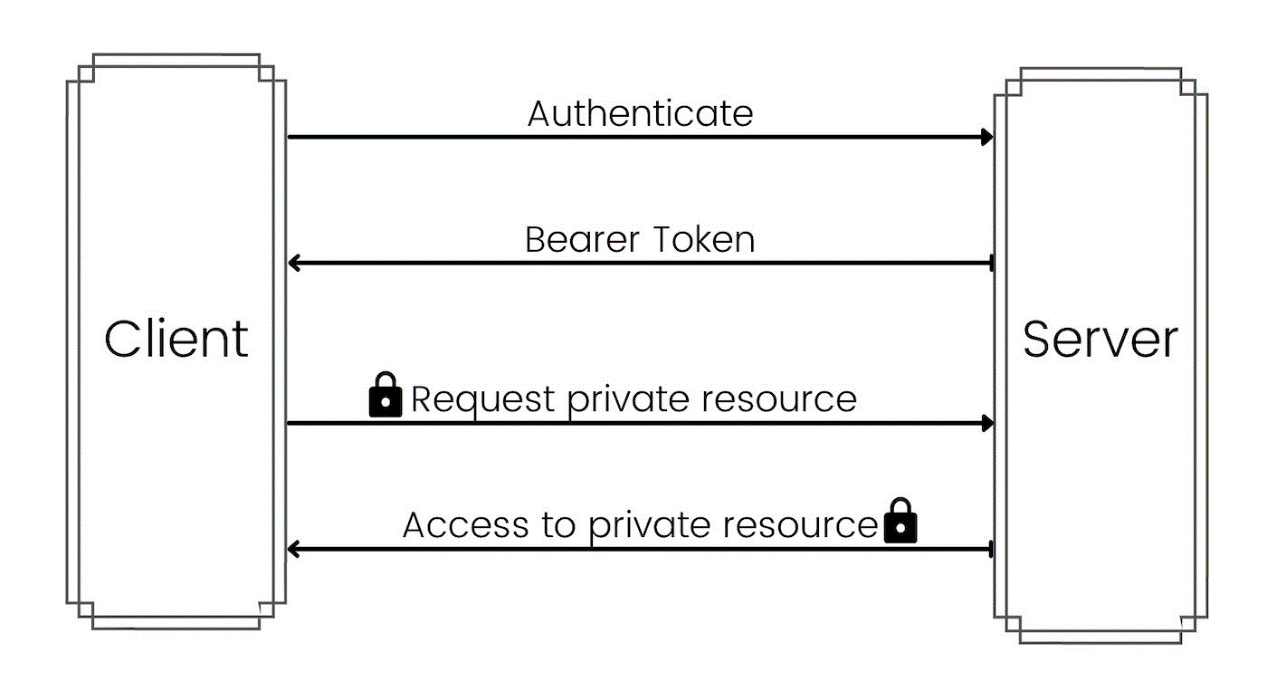
2. Authentication Methods:
The first step in making a connection is to set up authentication for your REST service. The ClaricoQUOTE API supports Bearer Token Authentication and in order to request a bearer token, you must request a token using one of the following login methods:
Username & Password
In this case we must first create a user login in ClaricoQUOTE to use for the request. This user can be a normal quote user or you can create a console user which will not consume a license nor will it have access to the website user interface. In either case, access to the API and functionality is the same.
Using the username and password created in ClaricoQUOTE, you can send a request to the token endpoint (https://quote.claricosystems.com/token) while passing the following key value pairs in the body of the request:
grant_type:password
userName:username@tenantid
password:password123
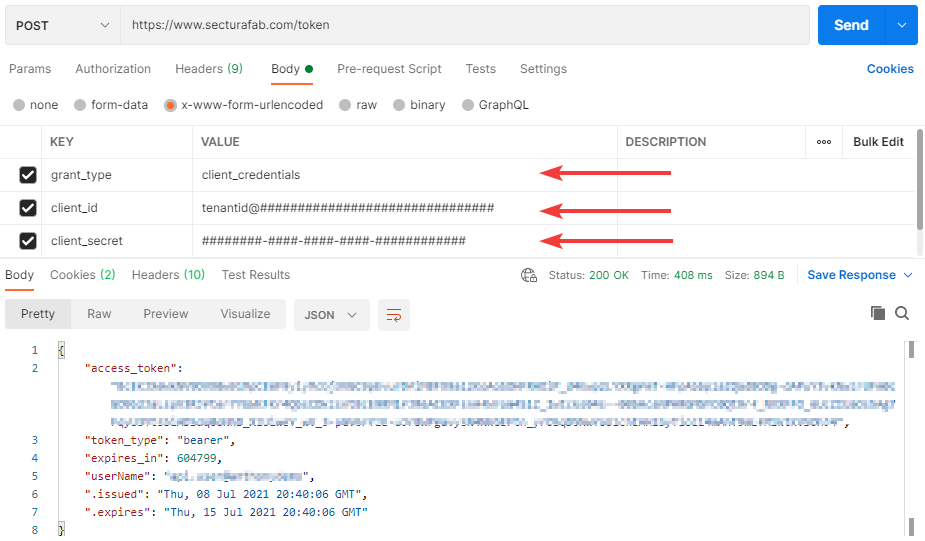
Client ID & Secret
In this case you must login to ClaricoQUOTE and navigate to the Setup > WebHooks > Api Key page and copy the client ID and secret for the ClaricoQUOTE tenant.
Using the client ID and secret, you can send a request to the token endpoint (https://quote.claricosystems.com/token) while passing the following key value pairs in the body of the request:
grant_type:client_credentials
client_id:tenantid@###############################
client_secret:########-####-####-####-############
3. Connecting to the API Using the Token:
Once the server has responded to a valid login method and returns a token, the client must send this token in the Authorization header when making requests to the API methods.
Authorization: Bearer <token>

Related Articles
API Calls
An API call is a request made by a computer program or application to communicate with an Application Programming Interface (API). APIs define a set of rules and protocols that enable different software applications to interact with each other. ...How to add ClaricoQUOTE Users
ClaricoQUOTE users can be added and managed with any Admin User. All new setups are created with at least one Admin User. To create additional users, log in with your Admin Account. First, navigate to the Setup Menu and select 'Users' under Users & ...Password Authentication
OAuth Password Authentication, also known as the Resource Owner Password Credentials (ROPC) grant type, allows a client application to request an access token on behalf of a user by directly handling the user's credentials (username and password). ...API Key Authentication
OAuth typically doesn't use API keys in the traditional sense, as it relies on access tokens for authentication and authorization. However, API keys can still play a role in OAuth-based systems, particularly in scenarios involving public clients or ...Groups
Groups Setup > Users & Permissions > Groups ClaricoQUOTE users can be assigned to groups. Various levels of permissions and access can be assigned to users through the use of groups. Groups can be set up by navigating to the 'Groups' section on the ...